Crusoe’s Dad here. We’ve never had so many people ask us how to make a costume than for the minions costumes, as seen in these popular videos:
So here’s a tutorial on how to make the minions costume yourself for your dog. A few things to note first:
- You need to be a bit crafty. It wasn’t the simplest costume I made and it most likely won’t fit perfectly on your dog the first time. Even on my third time making it for Crusoe I had to make adjustments after it was finished. Just a heads up, but if you think you got this, then go for it! 🙂
- If your dog is over 15 pounds, I don’t know how well this will fit. You be the best judge by looking at the video/guide.
- There is a full video tutorial below, as well as a step-by-step guide with pictures lower down.
Video Tutorial:
Step-by-Step Guide:
Ready? Let’s build a minions dog costume.
Items You Need

- Hot glue gun (you could also sew it probably. I don’t sew myself.)
- Black fabric, like an old t-shirt or something.
- The minions plush toy. You can buy online here. Make sure to get the “Kevin” character, and also make sure to buy the overalls for Kevin, which are sold separately.
- Scissors.
- Coat hanger and pliers/cutters.
- Cardboard (not really thick cardboard like from a moving box – more something like cereal box cardboard).
- Your trusty Crusoe coffee mug.
Step 1:
We want to cut a hole in the front of the face just below the minion’s goggles for the dog’s face. The circumference of the circle you cut should be just bigger than the vertical circumference of your dog’s head.
We’re going to do a pie-cut, so draw lines like this that we’ll cut along.

This is what it should look like once you cut along those lines. We’re not going to cut the triangular flaps off, but instead we will later glue them to the inside to create a soft edging around the hole – and to prevent it from fraying or looking messy.

Step 3:
Cut off the feet of the minion, just above the point where the blue fabric meets the yellow fabric of the feet.

Step 4:
Turn the minion over. We’re going to do a vertical cut starting about 4 inches down from the black band around the head, and down to right in between the legs.

Step 5:
Once you made the cut above, hollow out the minion of all stuffing except for the stuffing in the arms and the top of the head (about from the goggle band upwards).

Step 6:
On the inside of the triangular flaps on the front, spread glue thinly and evenly, and then fold back and glue to inside of minion. Be careful not to use big globs of glue as it will show on the outside.

Once done, it should look like this with a nice smooth edge.

Step 7:
Cut a round piece of black fabric, just slightly wider than the head of the minion itself.

Turn the minion on its head and flip inside out. We’re going to use this piece of fabric to seal off the top of the head, keeping the stuffing up there.
So along the thick inside seam of the goggle back of the minion, place a bit of glue at a top and glue the edges of this circular piece of fabric until it’s all sealed off.
It should look like this when done.

Step 8:
Cut a piece of cardboard as follows. Dimensions I’ve drawn on it are in inches.

edit: instead of 10” width, try 9”.
We’re going to place this piece of cardboard along the inside wall of the minion, with the straight edge upward. Ensure that you keep the non-colored side of the cardboard (the flat brown side) facing outward, as you may be able to see designs on the cardboard through the minion fabric.
It should look like this.

Once you have cardboard well-positioned, glue all along the top inside the minion, and to each side with thin layer of glue. You should also smooth out fabric as you do this so you don’t glue-in any folds or bumps on the outside.
Step 9:
On the back of the minion, make two cuts as shown below with the dotted lines.

Do not cut off the flaps entirely though.

Step 10:
Cut out a piece of cardboard with the following dimensions and shape.

Step 11:
Curve this piece of cardboard with brown side facing up, and place into back of the minion.
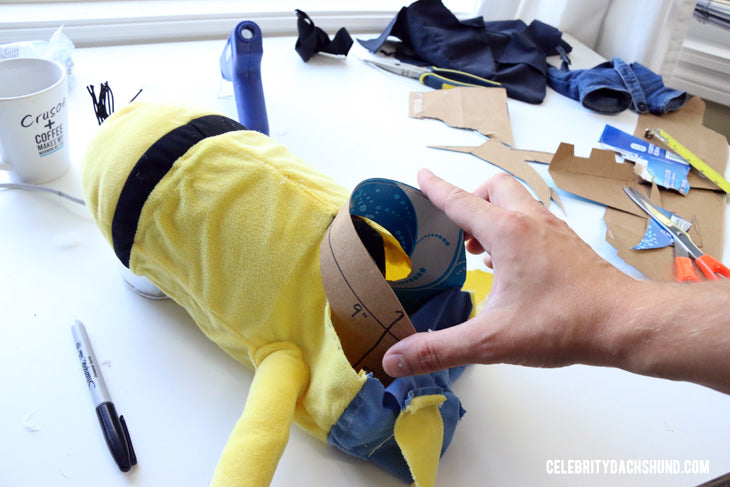
You want to glue the top of this curve to the bottom of the other piece of cardboard in the back of the minion. Then we’ll glue each flap of the curved piece to the inside walls of the other cardboard piece.

Step 12:
Reattach the flaps on the back of the minion to the cardboard arch. They should fit nicely, leaving about an inch of space from the end to the middle of the arch.

Step 13:
Cut a piece of coat hanger and shape as follows. The straight part should be about as long as the entire arm, but then you need that U-shaped curve to be attached to the inside cardboard with.
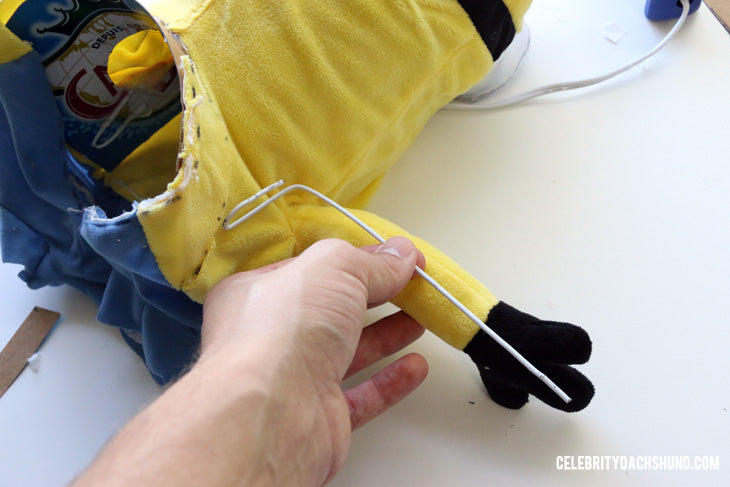
Working from the inside of the minion, push the straight part of the coat hanger up and through the inside of the minion arm. You should have just curved part hanging down nicely against the cardboard. Glue this part of the coat hanger to the cardboard.
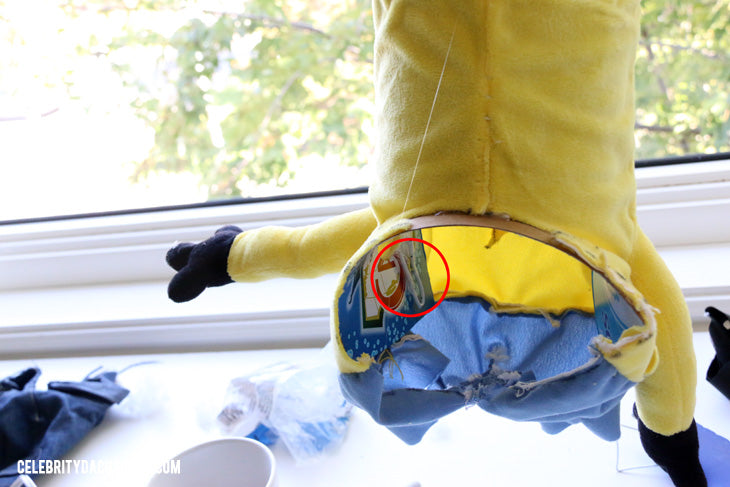
Cut another piece of cardboard and glue it over this visible part of the wire. This adds extra strength and will prevent the dog from being poked.

Repeat for the other arm.
Once the glue has dried, you can now bend the arms into the position you like. Make sure to clasp the base of the coat hanger against the cardboard (as seen above) while bending the arm, otherwise it might tear off from the cardboard.

Step 14:
Glue a piece of velcro over the arch on the back of the minion, about 4 inches long. Use the rough/prickly side of the velcro.

Step 15:
Turn the trousers on their side. You’ll see that the seem in the front comes down in a slight curve. We want to cut along this seam and continue cutting to make a full U-shape. Do this on both sides of the trousers.

It should look like this on both sides.
 Like this tutorial and our minions costume?
Check out Crusoe’s new 2016 calendar now available for sale in our store! Featuring all our best photos, including of course, Minions!

Step 16:
Turn the trousers over so the back is facing up. We’re going to cut straight down from the top to the crotch (right down to the seam joining the legs).

Step 17:
With the back of the trousers still facing up, turn the flaps over that were just cut and glue pieces of soft-sided velcro directly opposite of where the trouser’s original velcro is.

Step 18:
You may want to try the whole thing on your dog at this point, but I would recommend – depending on how tall of legs your dog has – to roll up the pants bottoms and glue them to stay. If they’re too long the dog will trip over them, and if you don’t glue the rolls in place, they’ll unroll.

Step 19:
Now you’re done! First put the minion body itself on your dog, then put the overalls on. The overall straps go up over the minions arms and attach to the velcro at the back, while the back-flaps of the overalls go to the side to attach to the same velcro piece on the back arch.
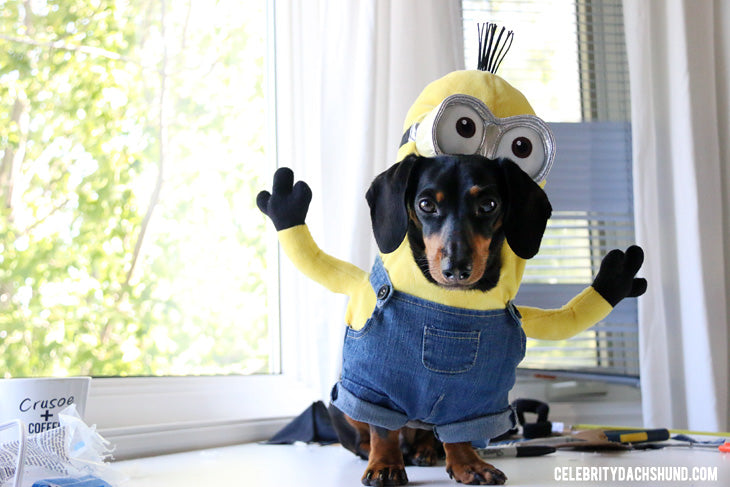
There you go!
Good luck, and have fun!
Cheers,
~ Dad
Like this tutorial? Please “like” this post? 🙂

